Python中提供了threading模块来对多线程的操作,
1. 多线程实例
线程是应用程序中工作的最小单元。
多线程是现实有两种方式:
方法一
将要执行的方法作为参数传给Thread的构造方法(和多进程类似)
|
|
方法二
从Thread继承,并重写run()
|
|
看源码:
|
|
所以如果重写了run,就直接调用run的函数了,如果run没有重新,就调用target函数。
2. 线程锁
通过threading.Lock()来创建锁,函数在执行的只有先要获得锁,左后执行完以后要释放锁:
|
|
实例:
|
|
3. 线程共享变量
多线程和多进程不同之处在于多线程本身就是可以和父进程共享内存的,这也是为什么其中一个线程挂掉以后,为什么其他线程也会死掉的道理。
|
|
4. 线程池
通过传入一个参数组来实现多线程,并且它的多线程是有序的,顺序与参数组中的参数顺序保持一致。
安装包:
|
|
调用格式:
|
|
|
|
消息列队
“ ”消息队列”是在消息的传输过程中保存消息的容器。
消息队列最经典的用法就是消费者和生成者之间通过消息管道来传递消息,消费者和生成者是不通的进程。生产者往管道中写消息,消费者从管道中读消息。
操作系统提供了很多机制来实现进程间的通信,multiprocessing模块就提供了Queue和Pipe两种方法来实现。
使用multiprocessing里面的Queue来实现消息队列
|
|
|
|
通过Mutiprocess里面的Pipe来实现消息队列:
- Pipe方法返回(conn1, conn2)代表一个管道的两个端。Pipe方法有duplex参数,如果duplex参数为True(默认值),那么这个管道是全双工模式,也就是说conn1和conn2均可收发。duplex为False,conn1只负责接受消息,conn2只负责发送消息。
- send和recv方法分别是发送和接受消息的方法。close方法表示关闭管道,当消息接受结束以后,关闭管道。
|
|
Queue模块
Python提供了Queue模块来专门实现消息队列 Queue对象
Queue对象实现一个fifo队列(其他的还有lifo、priority队列,这里不再介绍)。queue只有maxsize一个构造参数,用来指定队列容量,指定为0的时候代表容量无限。主要有以下成员函数:
- Queue.qsize():返回消息队列的当前空间。返回的值不一定可靠。
- Queue.empty():判断消息队列是否为空,返回True或False。同样不可靠。
- Queue.full():类似上边,判断消息队列是否满
- Queue.put(item, block=True, timeout=None):往消息队列中存放消息。block可以控制是否阻塞,timeout指定阻塞时候的等待时间。如果不阻塞或者超时,会引起一个full exception。
- Queue.put_nowait(item):相当于put(item, False).
- Queue.get(block=True, timeout=None):获取一个消息,其他同put。
以下两个函数用来判断消息对应的任务是否完成。
- Queue.task_done():接受消息的线程通过调用这个函数来说明消息对应的任务已完成。
- Queue.join(): 实际上意味着等到队列为空,再执行别的操作
例子:
|
|
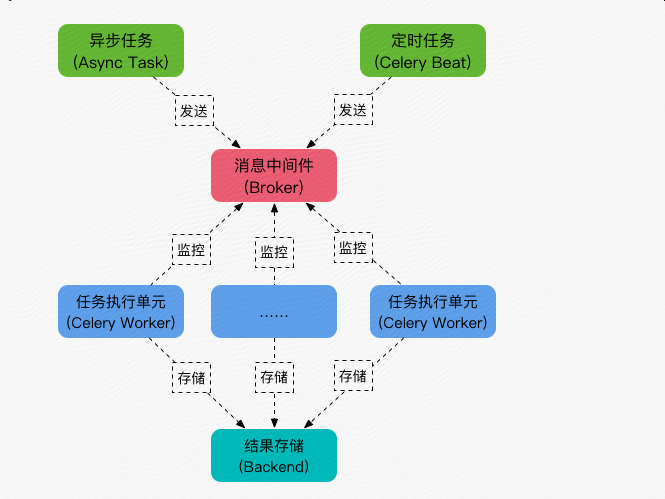
Celery异步分布式
什么是celery
Celery是一个python开发的异步分布式任务调度模块。
Celery本身并不提供消息服务,使用第三方服务,也就是borker来传递任务,目前支持rebbimq,redis, 数据库等。
这里使用redis
连接url的格式为:
|
|
例如:
|
|
安装celery
|
|
在服务器上安装redis服务器,并启动redis
第一个简单的例子:
|
|
启动worker
|
|
生产者
|
|
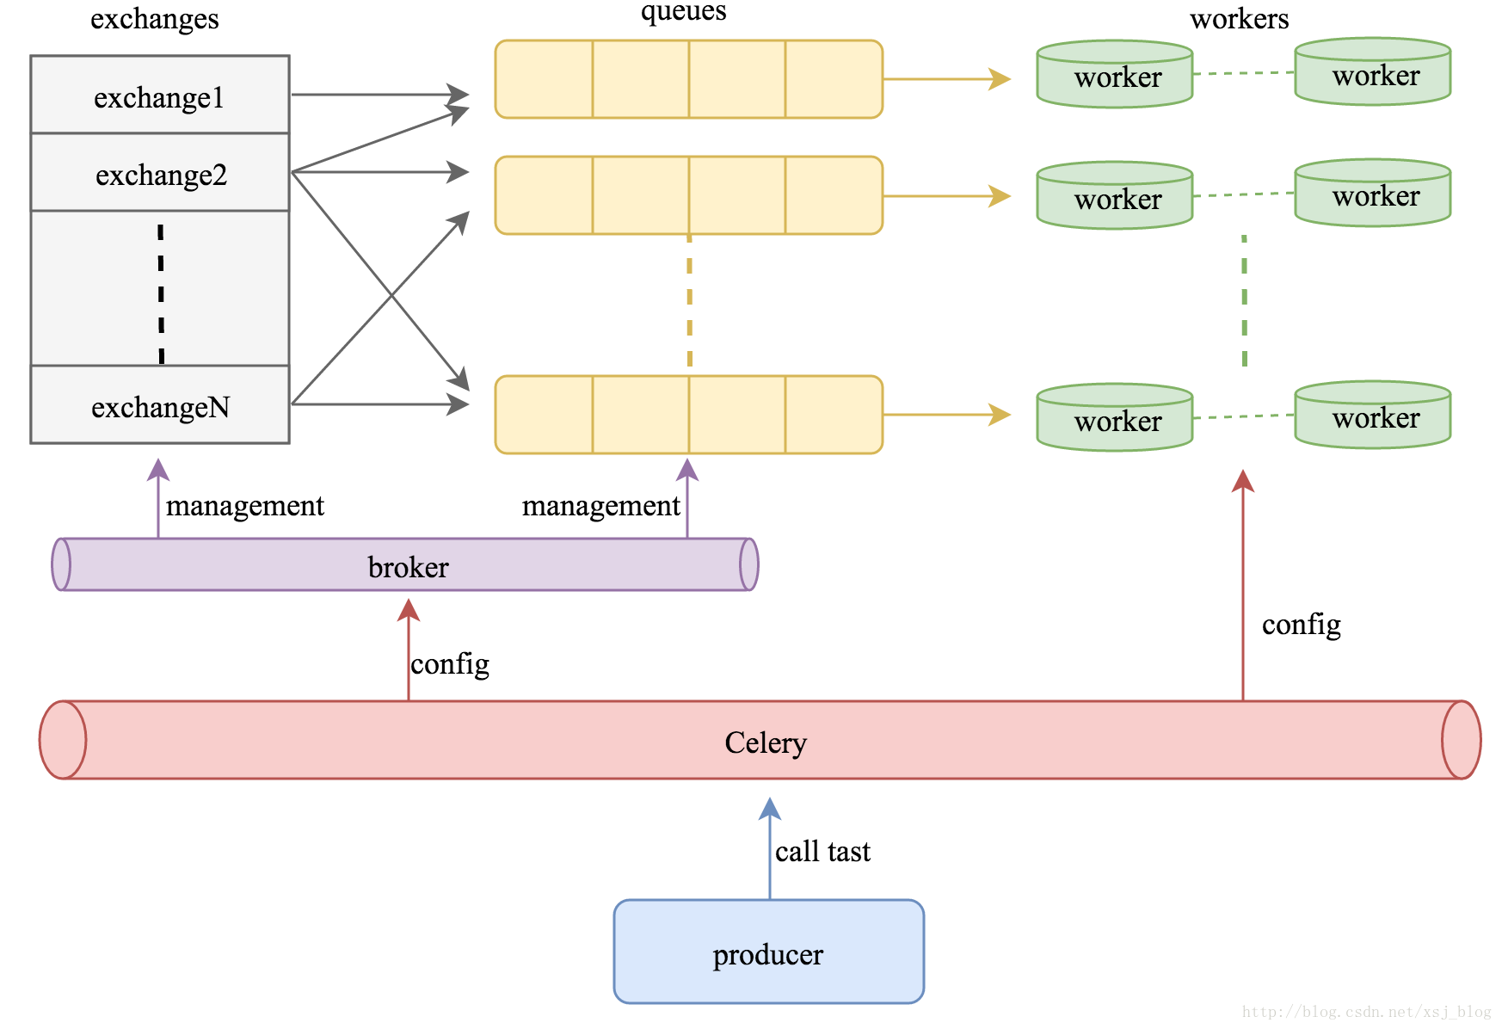
celery模块调用
既然crlery是一个分布式的任务调度模块,那么celery是如何和分布式挂钩呢,celery可以支持多台不通的计算机执行不同的任务或者相同的任务。
如果说celery的分布式应用的是话,我觉得就要提到celery的消息路由机制,就是要提一下AMQP协议。具体的可以查看AMQP的文档。简单是说就是可以有多个消息队列(Message Queue),不同的消息可以指定发送给不同的Message Queue,而这是通过Exchange来实现的。发送消息到Message Queue中时,可以指定routiing key,Exchange通过routing key来把消息路由(routes)到不同的Message Queue中去。
多worker,多队列
|
|
|
|
配置文件一般单独写在一个文件中。
启动一个worker来指定taskA
|
|
|
|
我们看到状态是PENDING,表示没有执行,这个是因为没有celeryconfig.py文件中指定改route到哪一个Queue中,所以会被发动到默认的名字celery的Queue中,但是我们还没有启动worker执行celery中的任务。下面,我们来启动一个worker来执行celery队列中的任务。
|
|
Celery与定时任务
下面我们接着在celeryconfig.py中添加CELERYBEAT_SCHEDULE变量:
|
|
注意格式,否则会有问题