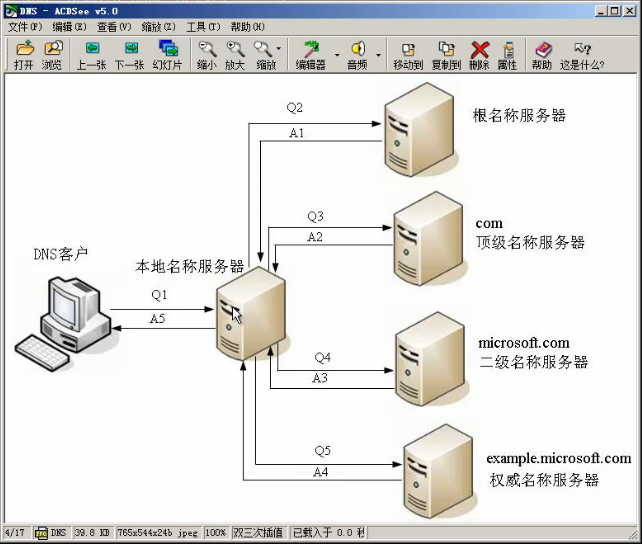
DNS 全称domain name server。域名服务器,用来解析域名的。
域名标准写法:www.qq.com.
DNS是如何实现解析域名的:客户端先查找/etc/hosts里是否有对应域名的ip,没有的话查找dns服务器(在/etc/resolv.conf下配置的),首先查找缓存,缓存没有,找.根名称服务器DNS,根名称服务器说没有,但我知道.com,又找.com顶级名称服务器,从.com找到microsoft.com。最终找到example.microsoft.com。找的过程都是找的dns服务器。
1
2
3
4
5
6
7
8
9
10
11
12
13
14
15
16
17
18
19
20
21
22
23
24
25
26
27
28
[root@linux ~]
[root@linux ~]
options {
listen-on port 53 { 127.0.0.1; }; //监听端口53,监听53端口的ip是谁
listen-on-v6 port 53 { ::1; }; //ipv6
directory "/var/named" ; //子配置文件所对应的目录
logging {
channel default_debug {
file "data/named.run" ; //日志。路径/var/named/data/named.run
severity dynamic;
};
};
zone "." IN { //.就是根域
type hint; //type 有三种,master主,slave从,hint根域的hint
file "named.ca" ; //根域对应的文件。文件在/var/named/下
};
[root@linux ~]
[root@linux ~]
$TTL 1D //1D就是1天生存周期
@ IN SOA @ rname.invalid. ( //SOA指的是解析记录。如A、CNAME等
0 ; serial //序列号
1D ; refresh //从每隔一段时间刷一次和主的数据是否有更新
1H ; retry //发现和主不通了,再过多长时间去试一下。
1W ; expire //过期时间。缓存时间,一周
3H ) ; minimum //和上面的TTL有关,上面没有定义,以此项为准
NS @
A 127.0.0.1
AAAA ::1 //ipv6
其中第二行的@符号指的是/etc/named.rfc1912.zones中定义的zone引号里面的内容。
1
2
3
4
[root@linux ~]
[root@linux ~]
[root@linux ~]
[root@linux ~]
1.正向解析 1
2
3
4
5
6
7
8
9
10
11
12
13
14
15
16
17
18
19
20
21
22
23
24
25
26
27
28
[root@linux ~]
zone "123.com" IN {
type master;
file "123.com.zone" ;
};
[root@linux ~]
[root@linux ~]
$TTL 1D
@ IN SOA @ admin.123.com. (
20161025 ; serial
1D ; refresh
1H ; retry
1W ; expire
3H ) ; minimum
IN NS ns.123.com.
IN MX 5 mail.123.com.
mail IN A 192.168.1.20
ns IN A 192.168.1.70 //对外服务应写公网ip
www IN A 11.11.11.11
bbs IN CNAME www
[root@linux ~]
zone 123.com/IN: loaded serial 20161025
OK
[root@linux ~]
options {
listen-on port 53 { 127.0.0.1;192.168.1.70; };
[root@linux ~]
[root@linux ~]
2.反向解析 想做邮件服务器,最好加下反解析。
1
2
3
4
5
6
7
8
9
10
11
12
13
14
15
16
17
18
19
[root@linux ~]
zone "1.168.192.in-addr.arpa" IN {
type master;
file "1.168.192.zone" ;
};
[root@linux ~]
$TTL 1D
@ IN SOA @ admin.123.com. (
20161025 ; serial
1D ; refresh
1H ; retry
1W ; expire
3H ) ; minimum
IN NS ns.123.com.
160 IN PTR ns.123.com.
20 IN PTR mail.123.com.
[root@linux ~]
[root@linux ~]
[root@linux ~]
从DNS服务器 1
2
3
4
5
6
7
8
9
10
11
12
13
14
15
16
17
18
19
[root@linux ~]
[root@linux ~]
options {
// listen-on port 53 { 127.0.0.1;192.168.1.70; };
// listen-on-v6 port 53 { ::1; };
[root@linux ~]
zone "123.com" IN {
type slave;
file "slaves/123.com.zone" ;
masters { 192.168.11.160; }; //注意大括号前后面有空格。
};
[root@linux ~]
[root@linux ~]
11.168.192.zone 123.com.zone
[root@linux ~]
[root@linux ~]
[root@linux ~]
[root@linux ~]
aming IN A 111.111.111.111
主上有更改,从上立马生效,需要在主配置文件中添加两条notify yes;also-notify { 192.168.1.20; };
1
2
[root@linux ~]
[root@linux ~]
iredmaill iredmail安装 iRedMail 是一个基于 Linux/BSD 系统的零成本、功能完备、成熟的邮件服务器解决方案。官网
iRedmail包含的套件:
postfix发邮件的
dovecot收邮件的
apache网页web访问,数据存放mysql或者openldap里面。
policyd拒绝黑名单
amavisd杀毒、扫描垃圾邮件
roundcube在web页面访问邮箱收发邮件的套件。即webmail
awstat分析日志
fail2ban防止暴力破解
iRedAdmin管理邮件,账户增加、删除、修改
需有域名和服务器,服务器配置内存不低于1G
首先修改域名的MX记录指向自定义的比如mail.lishiming.net上 ,mail.lishiming.net需A记录指向购买的公网服务器ip上。
1
2
3
4
5
6
7
8
9
10
[root@linux ~]
[root@linux ~]
127.0.0.1 mail.lishiming.net localhost
[root@linux ~]
[root@linux ~]
[root@linux iRedMail-0.9.0]
[root@linux pkgs]
[root@linux pkgs]
[root@linux pkgs]
[root@linux iRedMail-0.9.0]
将会出来类似于图片界面,yes–Next–按tab选择Apache(按空格键选项前会出来*号说明选中)–选择MySQL–设置mysql密码–设置域(填写域名)–设置管理员的密码–Next。输入y–是否启用iptables选择n–移动my.cnf选择y。
1
[root@linux iRedMail-0.9.0]
启动以上这些服务。
iredmail使用 唯有dovecot启动是失败,错误提示ipv6的ip失败,这时需编辑配置文件。
1
[root@linux iRedMail-0.9.0]
找到:
修改为:
1
2
listen = *
[root@linux iRedMail-0.9.0]
这时浏览器访问:https://mail.lishiming.net/iredadmin //提示:您的连接不是私密连接,这时点击下面的“高级”–继续访问。Add–User 增加一个邮箱用户。
foxmail新建一个账号,输入新建的邮箱用户名和密码。
接下来,进行发收邮件的测试。这时收件时速度有些慢,更改以下文件:
1
2
3
[root@linux iRedMail-0.9.0]
注释
[root@linux iRedMail-0.9.0]
iredmail增加域 5d6d.com MX mail.lishiming.net. //解析
浏览器访问:https://mail.lishiming.net/iredadmin //Add–Domain 增加一个域。5d6d.com
之后Add增加一个邮箱用户名lishiming@5d6d.com
在foxmail上右上角–账号管理–增加账号
测试收发邮件。
